Blender 101
BLENDER101
A “practical” guide to make low poly models for games in Godot
dragging from the tip opens a new view window
- “Numpad 5” for orthographic mode
- any setting can be apply to multiple objects at a time by selecting them with “shift” + “click” and clicking the option while holding “alt”
- middle click to lock one of the xyz axes
- “t” and “n” to close menus
“cntl” + “d” to make a copy of the object
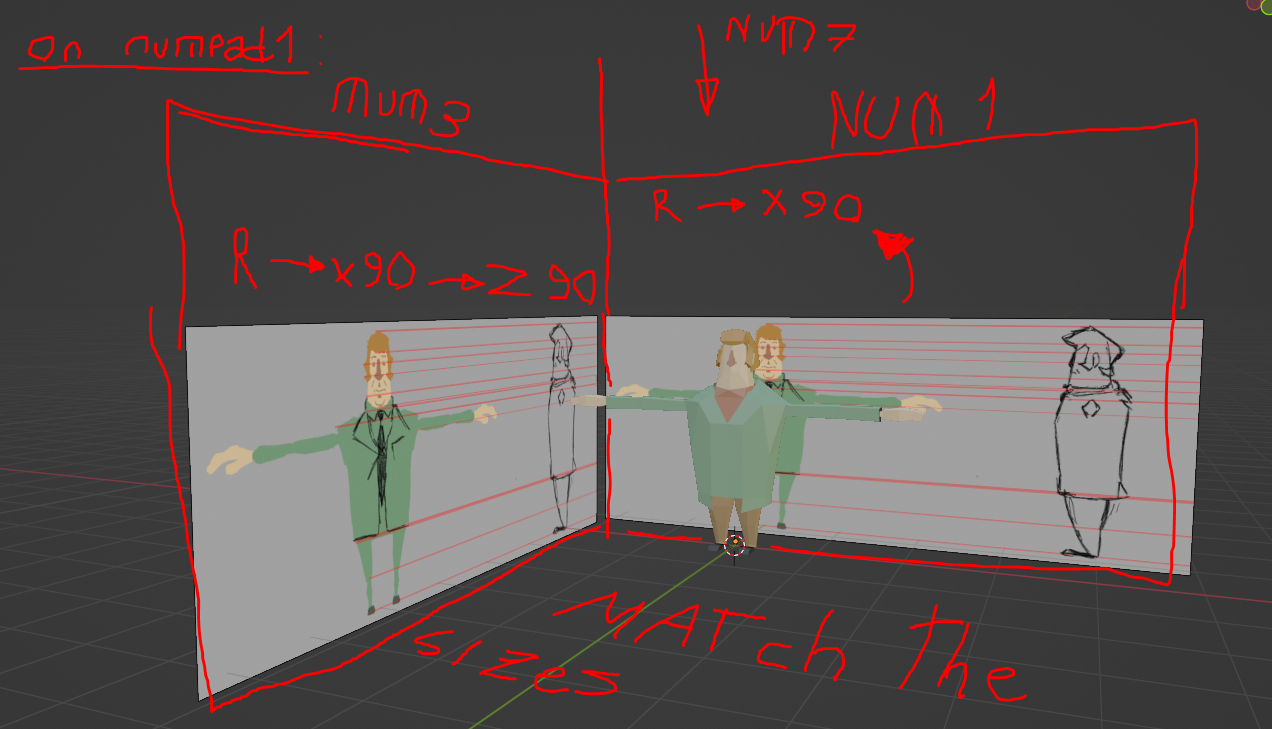
- “Numpad 3” is right of the orthographic mode and “Numpad 1” is the front
SYSTEM STUFF
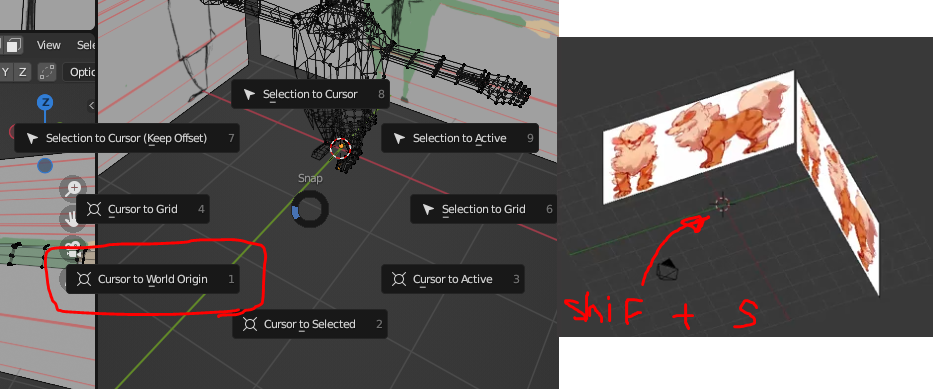
“Shift” + “a” place object on the location of the cursor
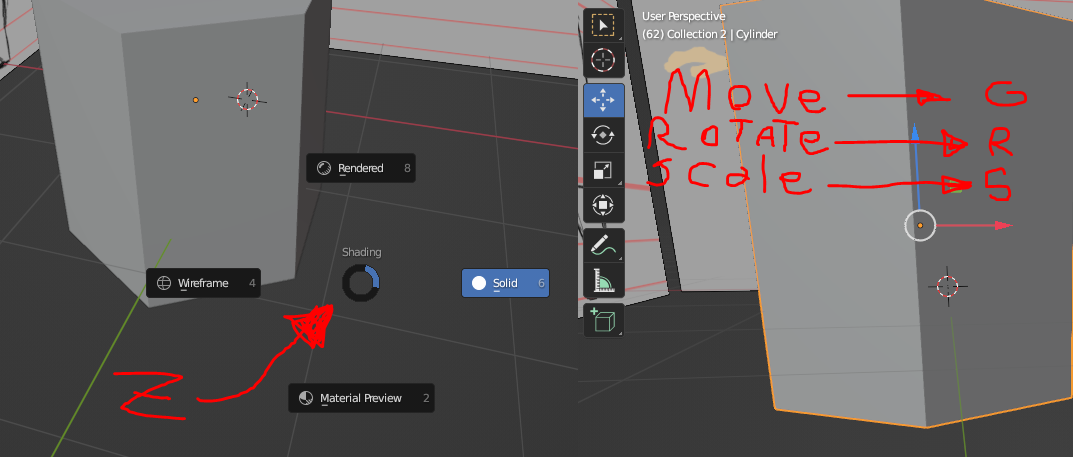
“Z” lets u change the view of the models
-wireframe: is for editing polygons
-solid: for viewing faces
-material: preview is for viewing and placing materials
-rendered: is for testing lighting and or seen the final productThe universal tools are enable in object mode:
-G to move positions(this is camera dependent)
-R to rotate the model
-S to scale it´s size
[IF U USE “alt” + any of the above u reset the transformation]
All of this are locked to your camera view so use the orthographic cameras to manually edit or look and axes(x, y, z) and input the value or manually move the line
Edit mode
Press “tab” to change from object mode to Edit mode 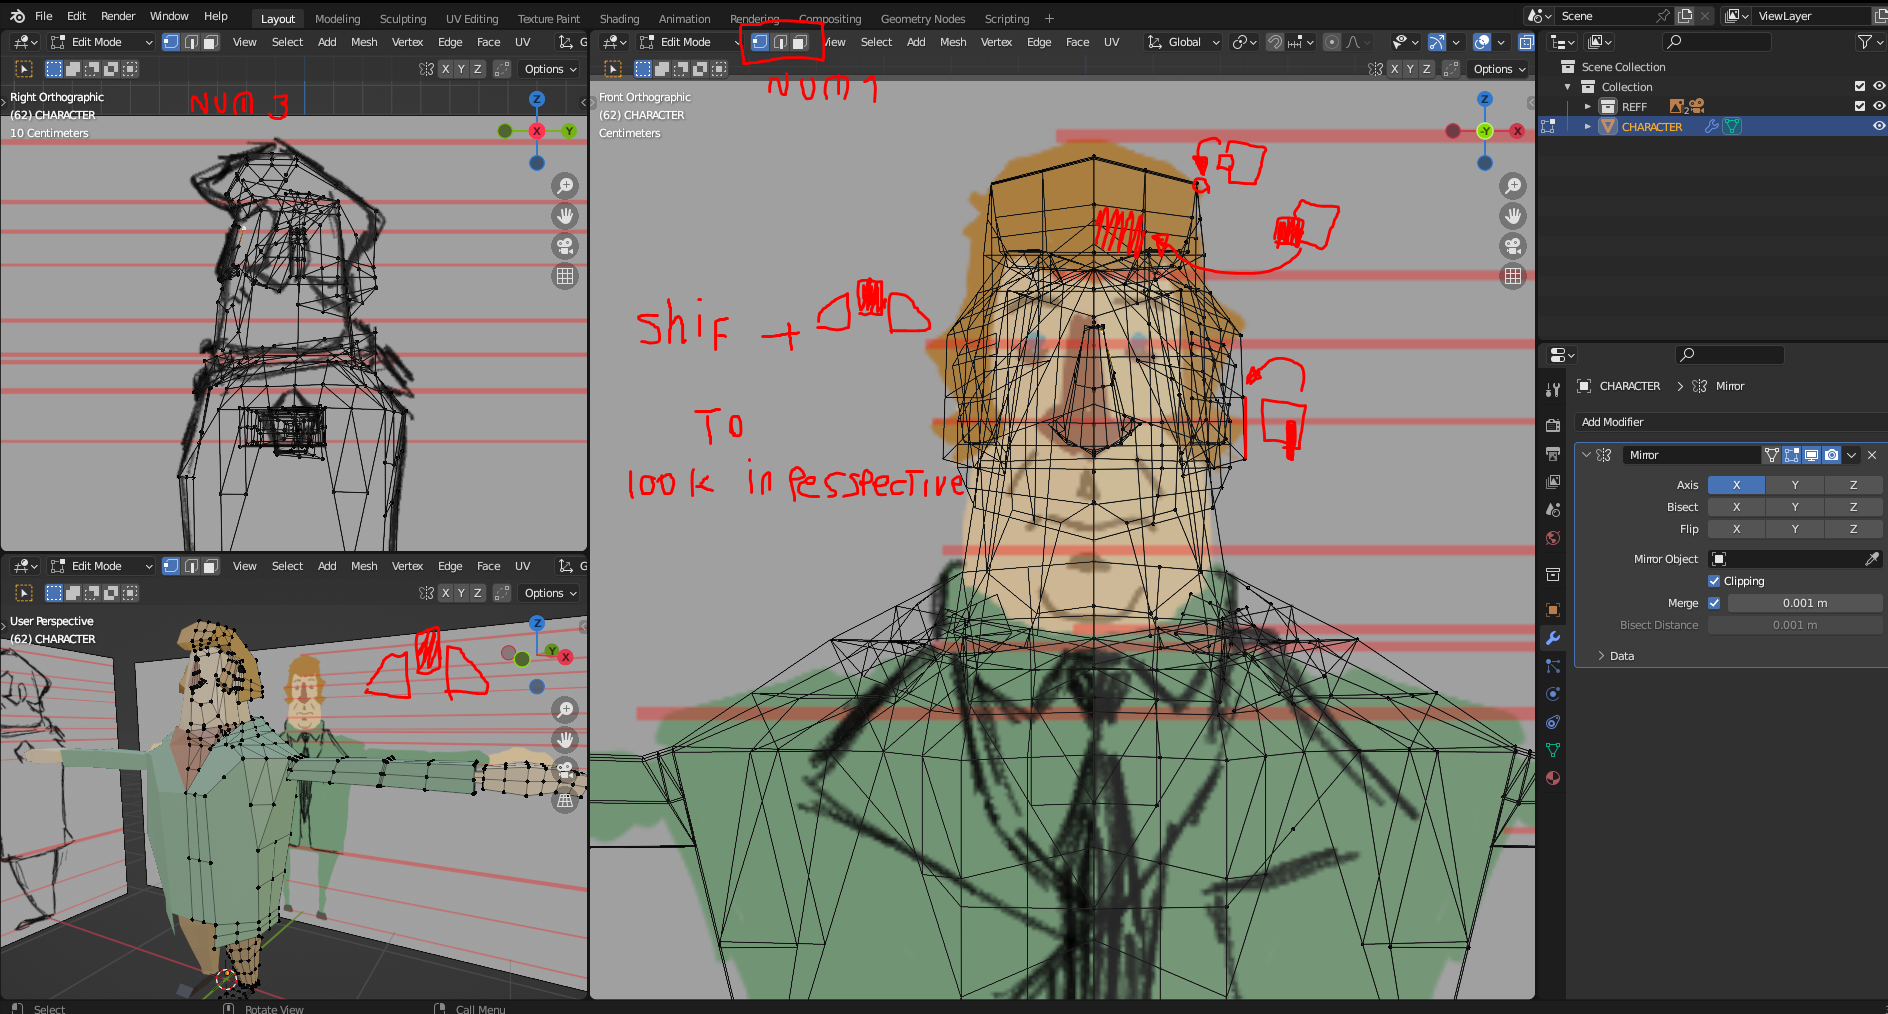
you can press “A” to select all the mode´s vectors/edges/faces
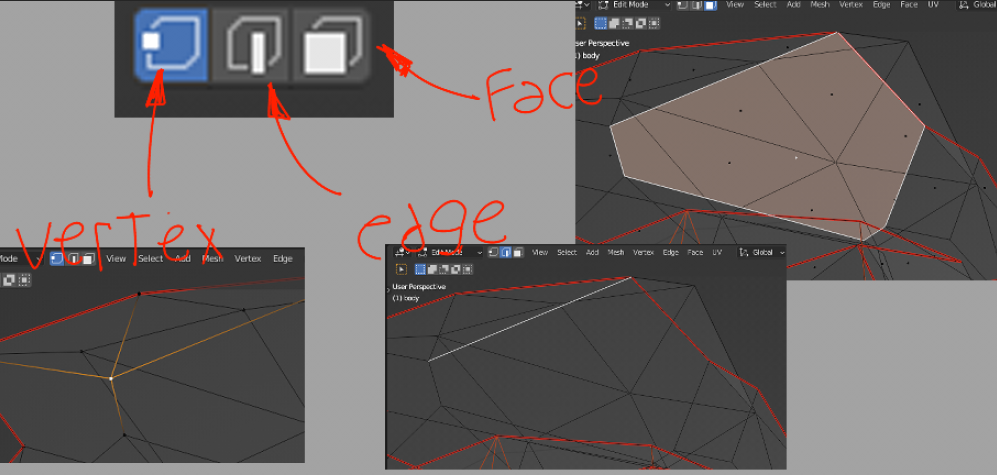
SELECT MODES
on the top left you can chose what ll be edited
TOOLS
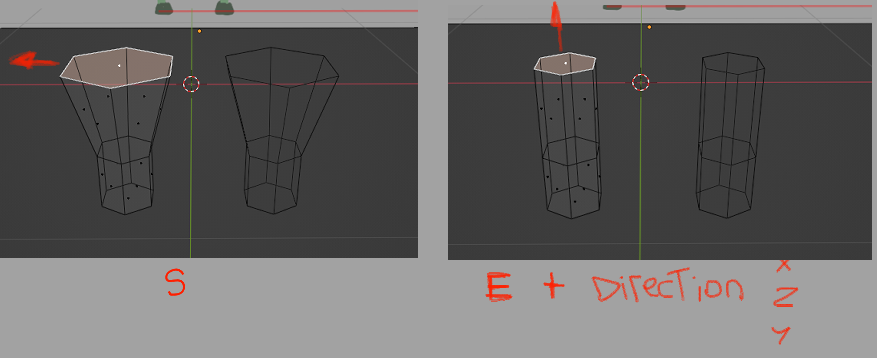
“g”:to move stuff
“E”:to extrude a new region(vector/edge/face) correlative to the one that’s selected
“S”: for changing the scale in stuff
LOW POLY MESH WORKFLOW
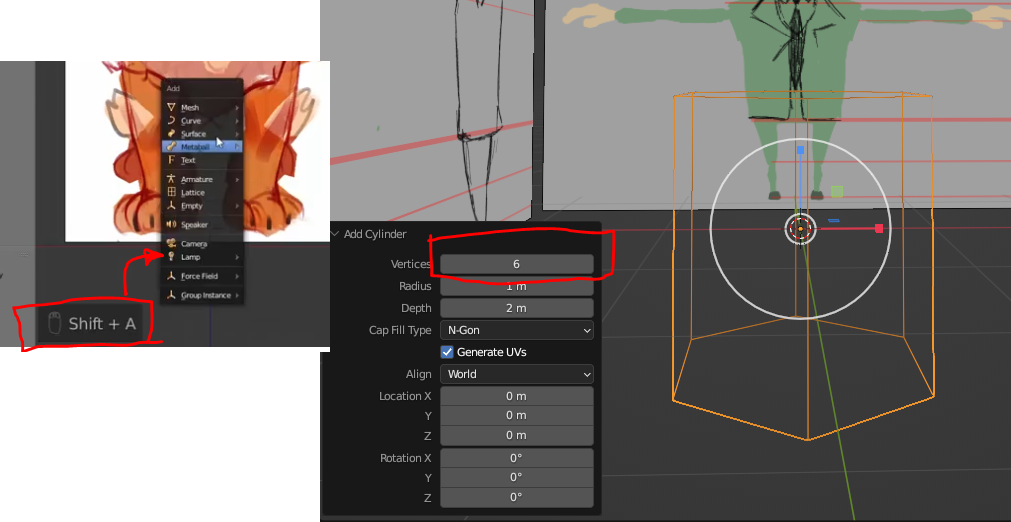
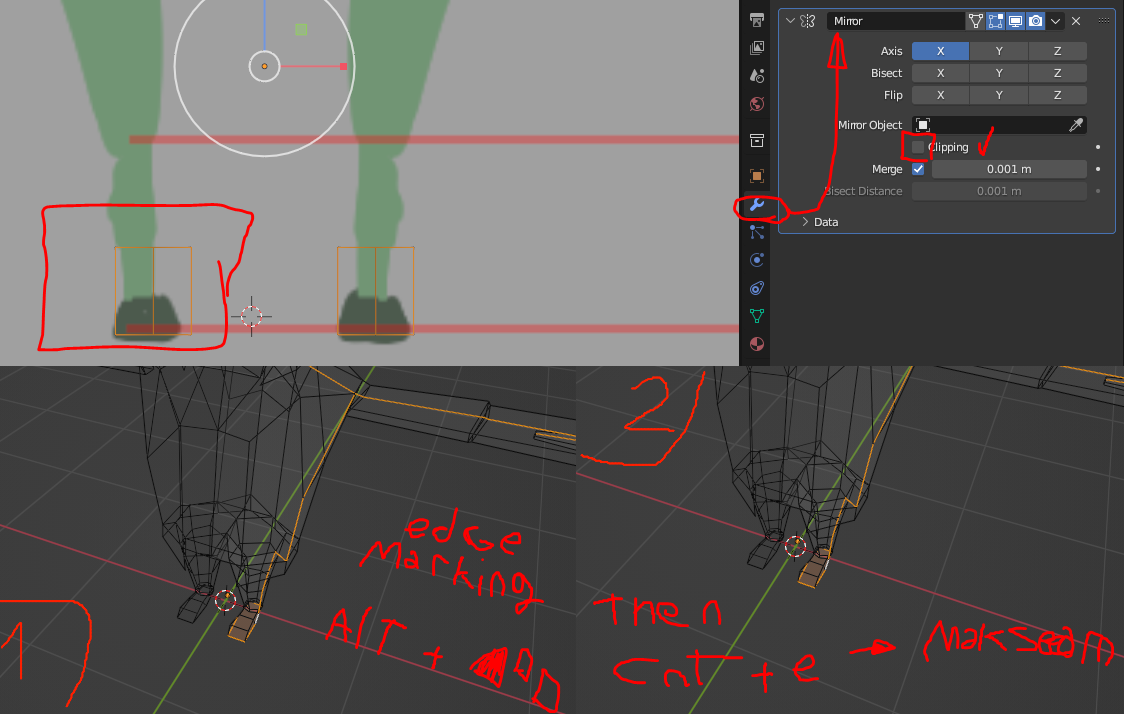
firs spawn(“shift” + “a”) a cylinder(its in mesh, this works best as a base for low poly, remember to change the vertices to 6 or 5) make it fit the sizes of your reference like so: 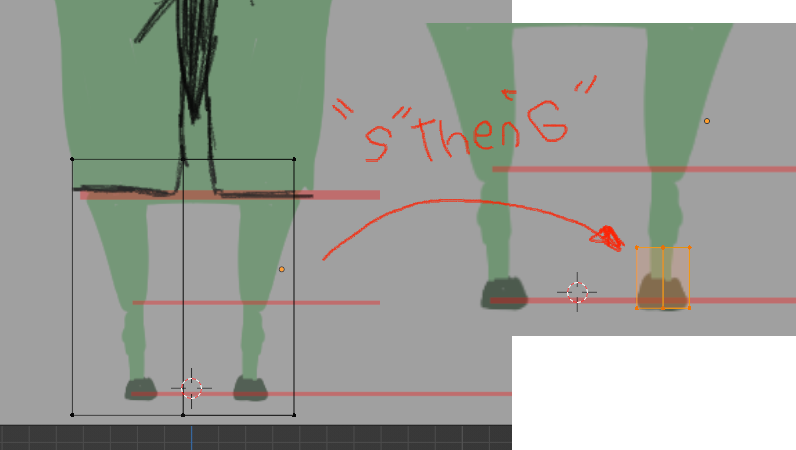
then you have to go to
- Modifier
- -add_Modifier
- \ Mirror
- -add_Modifier
- Modifier
and apply “Clipping”
FACE/NORMALS ORIENTATION
FACE/NORMALS ORIENTATION
do this every time u modify the mesh/ add stuff to it
select all the faces of the model (a in edit mode) press alt + n then chose recalculate outside
otherwise this appends
UV WRAPPING
once your model its finish u have to mark it seems(the edges of the mesh texture):
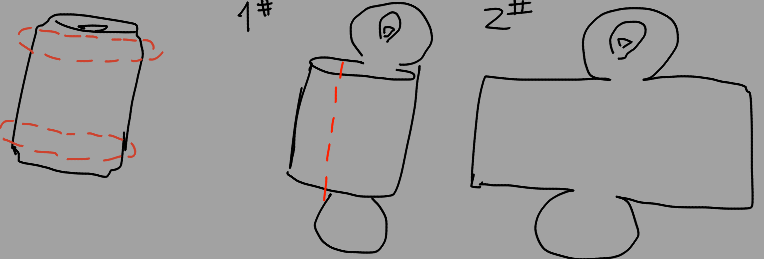
do the “soda can” method:
if u want to make a soda can flat with the least number of cuts u should cut it top and bottom edges and make a middle cut in the body: do this for every limb that u want to apply a specific texture(remember that seems don’t look to good, try to hide where they are so it doesn’t look 2 ugly)
UV MAPPING SETUP
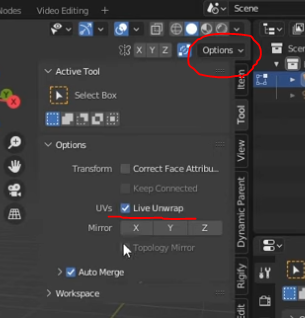
in edit mode select your mesh, go to option and select live unwrap
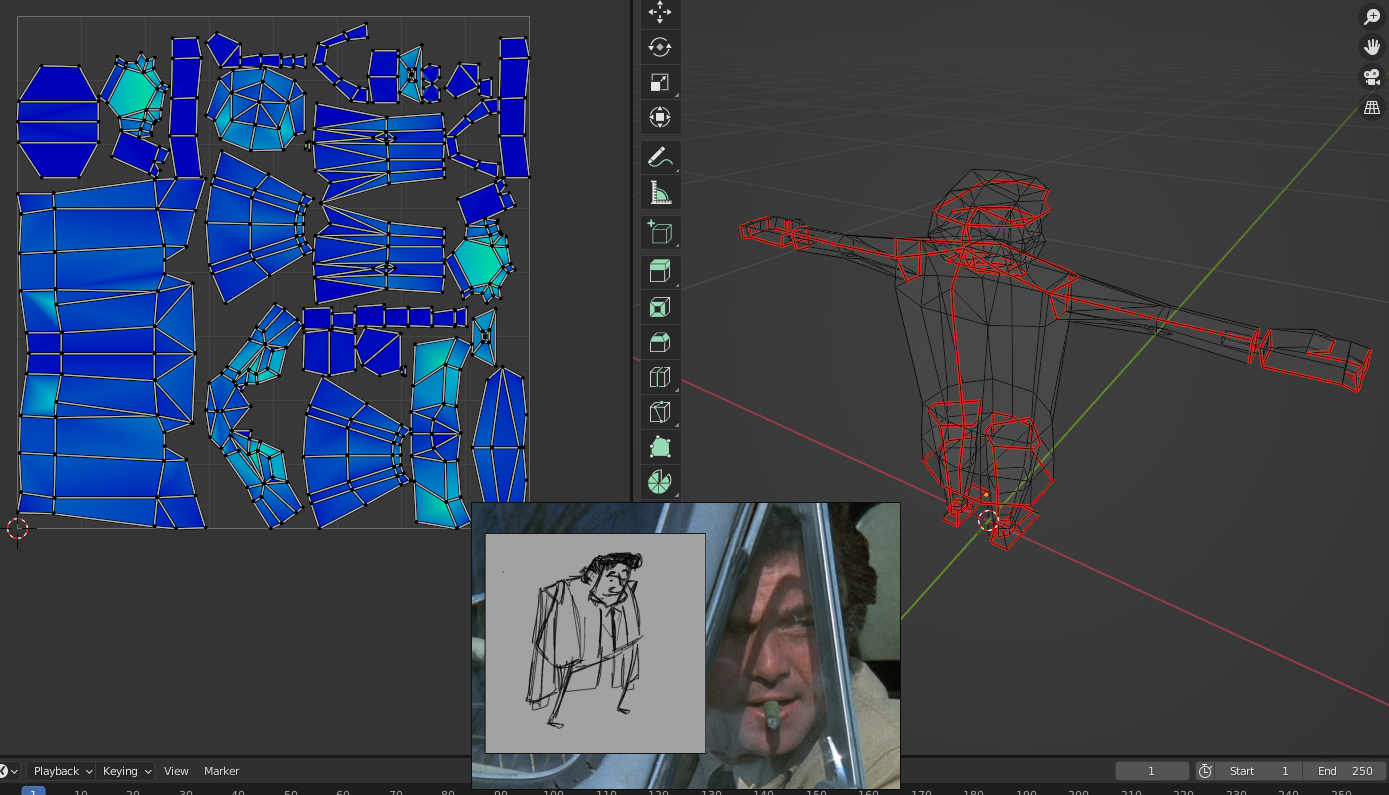
for the left window you can open the “UV editor” and selecting “display stretch” to make sure that none of your faces ll deform
blue == good / green == bad
ONCE YOU ARE FINISH with ALL THE SYMMETRICAL EDITS
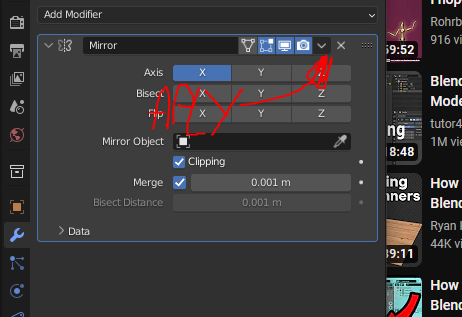
you can go to the mirror modifier and apply it, this makes it a real mesh, do this to export or to create a non symmetrical texture
BEFORE MAKING THE TEXTURE REFERENCE REMEMBER
1_ once your seems are marked you can select them apart
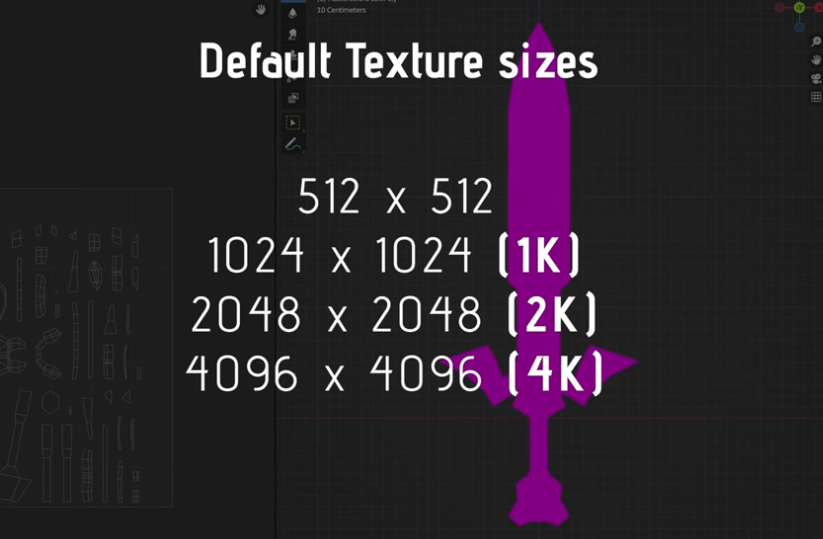
2_ try to make textures with this parameters in mind
alt + f rotates the object
alt + f rotates the object
for the materials, u can use the closest texture interpolation:
so there are no blurry filters for the textures
TEXTURE PAINTING SETUP
in the layout workspace (on the middle top of the screen)
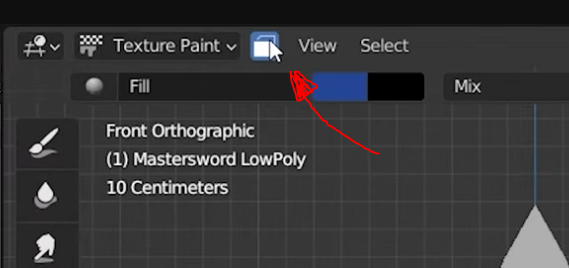
once in
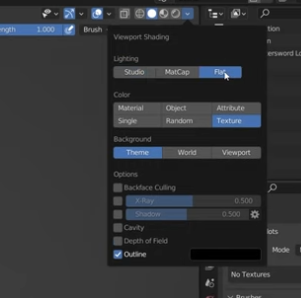
mode go to the shading options (top right) and select flat shading to see the pure colors
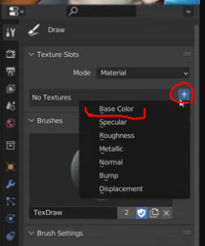
then, in the active tool setting you need to create a new material/texture, a base color in this case(this just modifies the albedos)
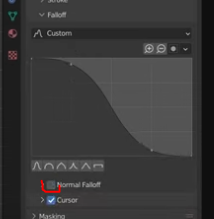
still in active tool go to falloff and disable it so u can draw near the edges
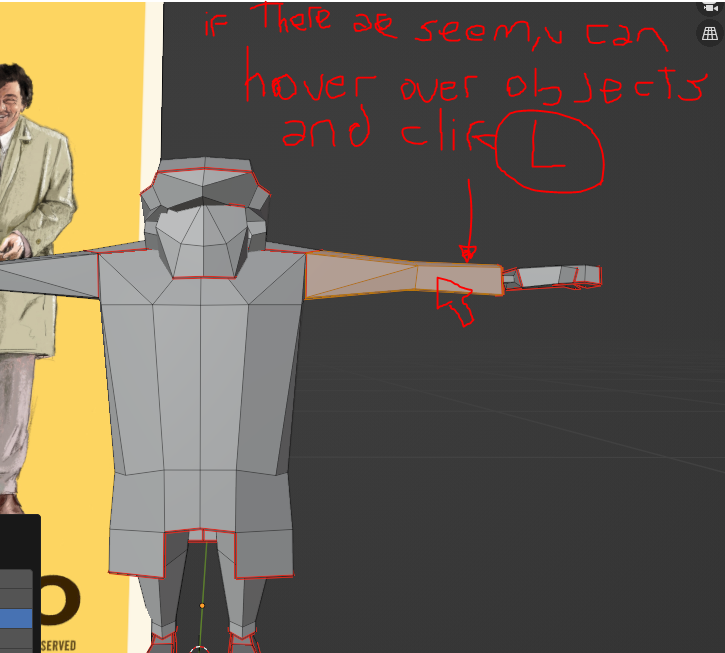
if u enable paint mask u can select faces in edit mode (or use “L” to select the islands that u delimited with the seems)and paint them with the bucket tool.
RIGGING FOR GAME EXPORTING
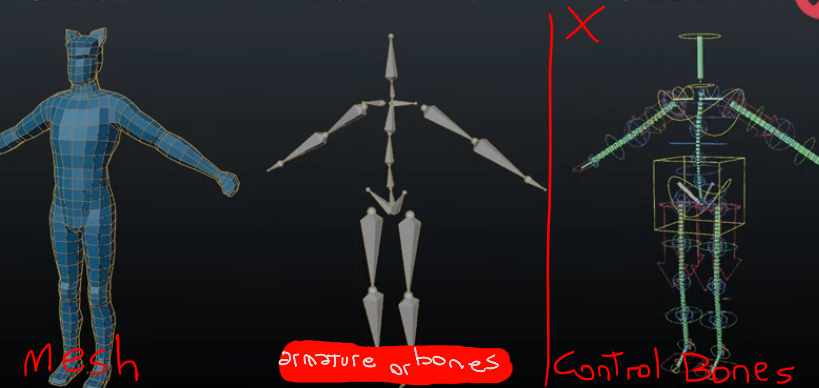
your asset needs a rig(armature or bones)to be animated and to store its animations, u ll end up with 3 main objects in the file:
-the mesh: this is the 3d model with its own materials and textures.
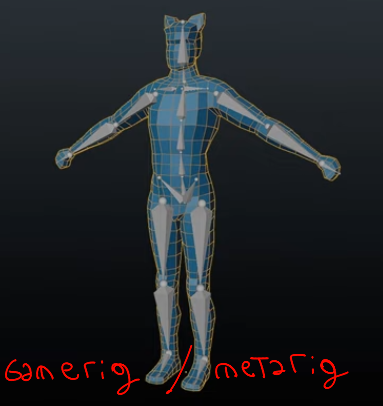
-the meta rig: the game rig is a combination of the rigged “deform bones” for the game engine to have a reference of the bone hierarchy and the “vertex weights” that are the connection of the character mesh and the deform bones (this determines how much the mesh ll stretch when the bones deform and how pronounce the deformation will be).
can add the -noimp
-The game rig is the one that u export,the meta rig is the base state of the model, it uses the control rig for animations and drivers that are of no use to the game engine, thats why we create a game rig, which it is just a meta rig with out the constraints and all the control rigged animations baked in
-the control bones or control rig: this is what u use to interact with the 2 other objects in the animations, it lacks deforming bones, a bones hierarchy and you can implement any constraints drivers or whatever you want in it coss once the animations are baked into the model, u wont have further use for this bones in the game editor, so u shouldn’t export this bones.
can add the -noimp
FOR THE GAME RIG/META RIG
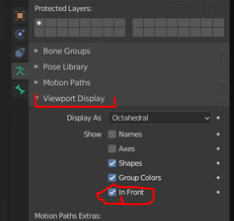
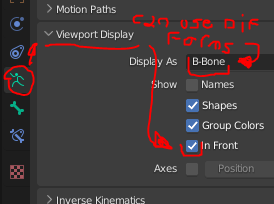
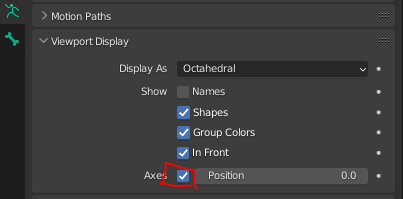
In edit mode, go to object data -> properties and display the bones in front
its good practice to change the display as types of bones for different rigs
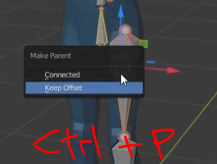
THE SPINE MUST BE THE FIRST THAT U DO once all your bones are in place start parenting (keep offset):
Coss sometimes the keep offset doesn’t work well and blender sets the first bone as the root bone
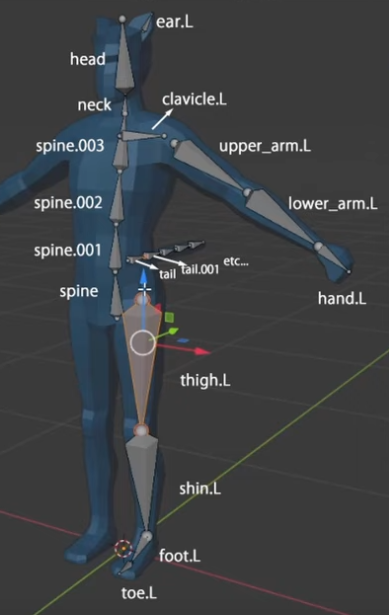
Give all symmetrical bones the “.L” suffix it should end up like so:
(REMEMBER!!!!!!!!! The last selected bone ll hallway be the root of the offset, if u select more than the 2 bones (“shift” + “click”) the last one been selected ll be the parent):
once u r done select all bones(“A”) in edit mode and symmetrize
and name the armature “game_rig”
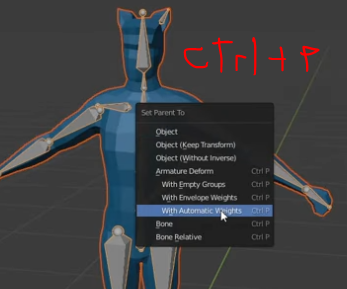
to finish it u have to parent the mesh to the meta_rig(game rig if u gonna export it manually)
beware the shitty automatic weight painting, u ll have to modify that stuff manually using:
WEIGHT PAINT WORKFLOW
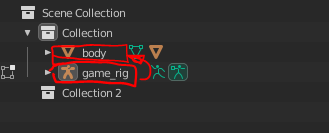
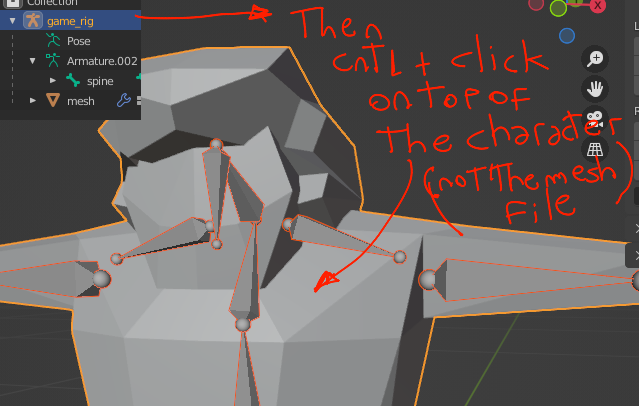
in object mode select the “game_rig” or “meta_rig”(mesh + armature)and the “mesh” in the 3d viewer, NOT on scene collection
and go to weight paint mode
now the mesh is in weight paint mode and the armature is in pose mode:
inside of “tools” u have to enable 2 settings for the weight painting, the auto normalize
FOR THE CONTROL RIG
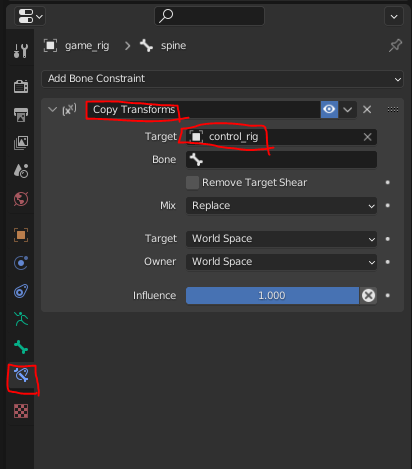
first, establish the connection of the game rig and the control rig using constrains:
in the game rig go to one bone and add the following constraint
don’t be scared if its looks like so
then select all of the bones(pressing “A”) and load the following code in editor type → text editor:
1
2
3
4
5
6
7
8
9
10

import bpy
#Switch to Pose Mode.

sel = bpy.context.selected\_pose\_bones

for bone in sel:
  name = bone.name
  bpy.context.object.pose.bones\[name\].constraints\["Copy Transforms"\].subtarget = name
then apply it(this works coss the bones in the game rig and the control rig are the same)go to
ROOT CONSTRAINTS SETUP
REMEMBER: ALL BONES MUST BE CONSTRAINT TO THE ROOT BONE
ALSO[ ALL IKS AND DRIVERS MUST BE NON DEFORMING BONES ]
first set the snapping to increments and turn on the snap during transformation
for the root bone
align the axes to the word axes name it “root” then copy the root bone to make the “pelvis control”(remember to toggle the snapping during transformation) once bout of the bases are done, set the constraint(keepoffset : ”cnt” + “p”)by: first clicking the spine then setting the pelvis control as a parent and the root as a parent of that one
IKS EXAMPLES (inverse constraint)
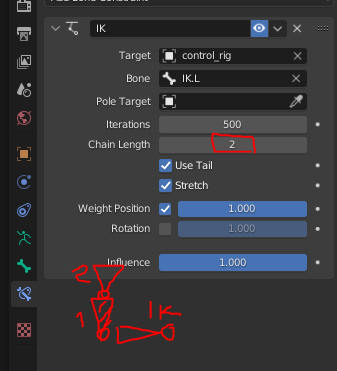
for the ik of the leg, fist, extrude a bone from the leg by disconnecting it with “alt” + “p” and clear parent, in pose mode, name it (“IK.L” in this case) then shift selecting the shin bone u do “cnt” + “shift” + “c” for the constraint menu choosing inverse kinematics once the constraint is set, go to the target(in this case the shin bone)and in chain length slider specify how many child bones the constraint affects
(REMEMBER: ALL BONES MUST BE CONSTRAINT TO THE ROOT BONE)
HARD LIMIT CONSTRAINT MOVEMENT
if u don’t want the constraint moving on specific axes, go to the target, inverse kinematic and lock them manually
SOFT LIMITS OF CONSTRAINT MOVEMENT (pole target)
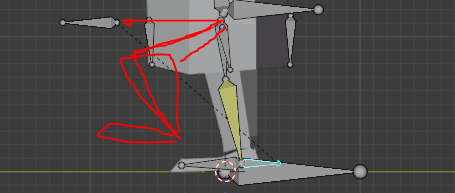
if u want to move the constraint until it hits a certain spot u have to make a second constraint, in the in this case, u want the shin to not deform when going up, so u extrude a bone from the shin and move it up a high where the leg stops twisting, like so:
name it (in this case “pole.L”) set the target like so:
then in edit mode select the pole, shift select the IK control and keep offset so the top moves with it
MAKE BONES IGNORE HIERARCHY (copy location constraint)
if u want a bone to not be aftereffect by a parent bone, u have to extrude it from the bone hierarchy and only be move by the IKs
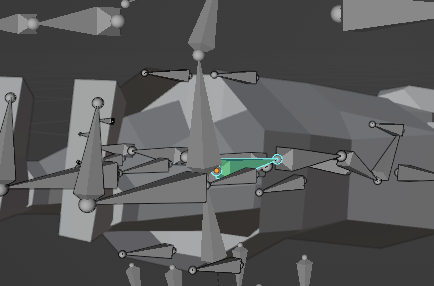
(you would be skimping a bone in the hierarchy). On this example, the foot should stay stationary when the body moves but it does this:
select the foot press “alt” + “p” in edit mode and clear its parents then select the shin bone(the one in yellow in the picture) and shift select the foot, “cnt” + “shift” + “c” for the copy location transform, the foot is going to go for the shin location, to make it respect the bones like before go to bone constraints properties, head/tail value to 1
REMEMBER: once done select the “.L” bones go to edit mode → armature and then select symmetrize
IK FINAL TOUCHES
in pose mode go to bone properties, first go to deform, select all none deforming bones(just the IKs and motors) hover the mouse over the checkbox and while holding “alt” u ll disable all the selected bones deformation.
For giving bones a custom look, u ll have to create a shape or curve in the object mode(i recommend creating a different folder for the bone references and the hidden it so they don’t boater)once it is done go to pose mode → bone properties inside view port display, there is custom object and select your bone reference
FIX ERRORS/ ADD BONES TO THE ALREADY FINISHED METARIG/GAME RIG
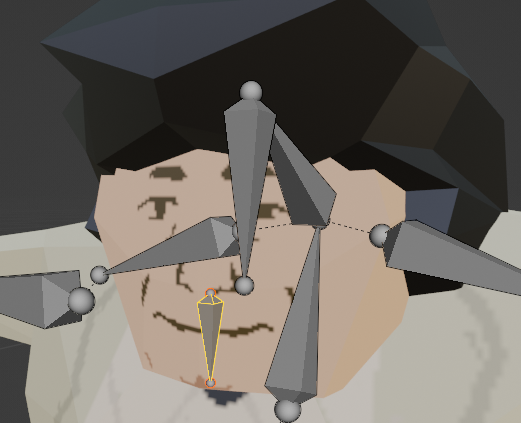
there are 2 ways to go about it, coping the new armatures or making sure that the new armatures that u want are in the same place in bout rigs, for this example i’m adding a new bone so the face can be stretched(if u forgot: extrude “e” a new bone and split “y” it, select the splitted bone then shift select the face bone and “cnt” + “p”)
then “shift” + “d” to make a copy of the new bone and separate it with “p” select the new armature then “shift” select the control rig and press “ctrl” + “j” to merge them
make sure it haves the same name in bout armatures “chin in this example” select the new bone(the meta rig one) in pose mode shift select its parent bone(first the new bone then the parent) then go to pose properties
properties -> constraints -> copy Constraints to Selected Bones
once that’s done in bone constraint properties change the target bone to the new one
because u created new bones u need to reparent the mesh to the meta rig,in object mode click the mesh(in the 3d viewport) then shift click the meta rig , “cnt” + “p” and u’ll have to choose either set parent to: with empty groups if u already had weight painted the bones or automatic weights if u didnt
ANIMATING ON BLENDER WORKFLOW
go to pose mode, in the edit type on animations select Dope Sheet, once there the default editing context been displayed is Dope Sheet, change it to action editor
then create a new action and set its fake user so u don’t lose your animations in the NLA editor or something else goes wrong
with “a” select all of the bones and with “I” u ll open the insert Key Frame menu, chose Location and Rotation(..& Scale if u ll change it)so u ll have your first frame, if u want to make a key frame toggle auto keying set when it happens and it ll record it
to make a mirror copy of an action copy all the changes down in the action editor move the cursor where u want the mirror to be then press “ctrl” + “shift” + “v”, “shift” + “d” to duplicate it normally and “shift” + “e” to set the key frame extrapolation method
EXPORTING TO GODOT
the manual way of exporting a model with animation is:
https://www.youtube.com/watch?v=FW8w6X1fLg8
this doesn’t work good enough so people made an addon to improve the workflow:
https://toshicg.gumroad.com/l/game_rig_tools
ORGANIZING THE ANIMATIONS FOR EXPORTING
if u want to export the control rig animations u ll have to organize them in the NLA(nonlinear animations) by:
selecting an animation in the dope sheet editor type making sure it plays correctly, then changing the editor type to nonlinear animation and organizing them one by one like so: 
EXPORTING GODOT GAME RIG GENERATED BY THE GRT ADDON
first select the control rig or meta rig if u have one(if u had a control rig/meta rig select that one or don’t, check the end result coss sometimes it doesn’t work right :/ )
(The meta rig only haves the rig and the mesh, the control rig haves the animations(the instructions on how to move the meta rigs/game rig) bones, using this addon u ll take the meta rig and bake the animations of the control rig. U r doing this to avoid exporting stuff that Godot cant use like drivers and non deforming bones)
MAKE SURE THAT THE BONES ARE MARKED AS “DEFORMING BONES” AND THE IKS AND CONSTRAINTS ARE NOT then go to the game rig tools in the pose mode and select generate game rig (there a lot of setting for the moment leave them alone), sometimes the addon cant get your rigs hierarchic right when game rig so u ll have to make sure its set right by:
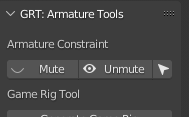
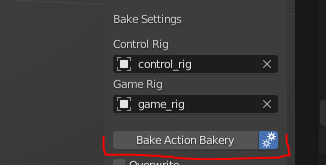
the new game rig cant move on its own coss its constraint to the meta rig, so u ll have to mute the constraints using the addon and check one by one if the hierarchy is the same (u can also check in the outliner editor type but this way gives better visual feed back)once u are done checking, revert any changes to the rig(“alt” + “g” “r” or “s” )now go to the game rig tools menu →GRT: Action Bakery and load them all select the control rig and game rig location and bake them animations (they should be the ones without prefix if u done it right)
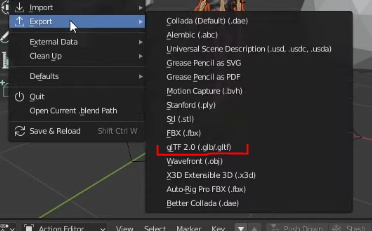
then export it as gltf 2.0 (if u have blender 3.0 or older add the tag “-noimp” at the end of all extra stuff)in include, mark selected objects, in transforms +y up, in geometry apply modifiers and THE MOST IMPORTANT in Animation keep group by NLA track and Export deforming bones only
GODOT SPECIFIC STUFF
EXPORTING MAPS WITH COLLISION
“shift” + “d” all the objects that u want to make a collision mesh out of(or move an object shape as the collision that u want for the level) and then add the suffix -colonly then select the parent object
it doesn’t have to be the same name, just add the suffix at the end
shift select the collision that u want, press “cntl” + “p” then select object (make sure that its inside of it)u can hide it if u want. Once that’s done export the model as Collada(default)(.dea)
STUFF FOR AUTOMATIC COLLISION
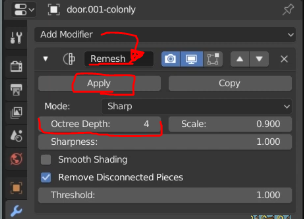
Once u make the copy of the object u can apply the mesh modifier for simpler collisions (play around with octree depth for different results)
BLENDER TO GODOT SUFFIXES
1
2
3
4
5
6
Remove nodes (-noimp)
Create collisions (-col, -convcol, -colonly, -convcolonly)
Create navigation (-navmesh)
Create a VehicleBody (-vehicle)
Create a VehicleWheel (-wheel)
Rigid Body (-rigid) Animation loop (-loop, -cycle)
CREATE A SEPARATED FACE TEXTURE AND PREPARE IT FOR ANIMATING IT
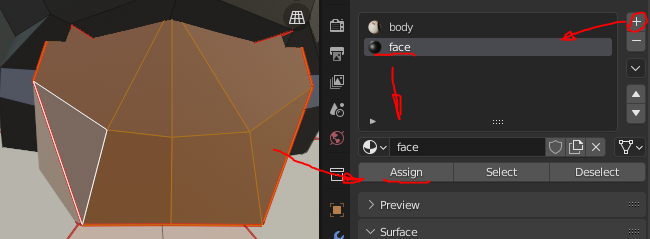
This needs to be more streamline but for the time being, this is the best way to animate a face with a shader. First create a new material inside material properties and assign the face to it
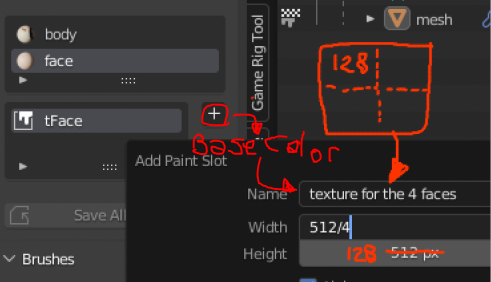
then open the Texture workspace and create a new base color inside the new material(it u had a size for the face in mind multiply it by the amount of faces that u want or if u had a size restriction for every texture divide it)
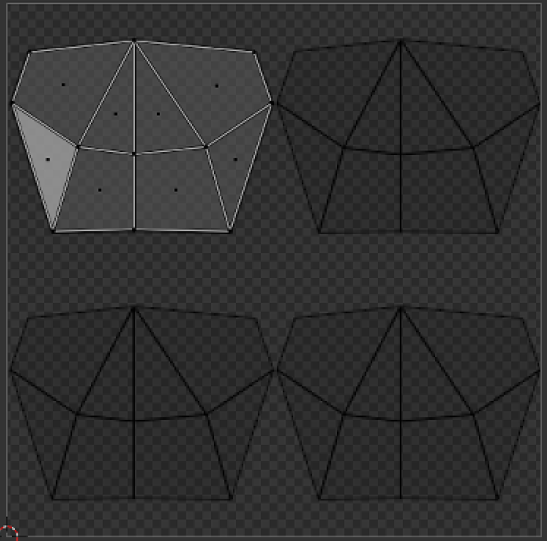
once u create the texture open the UV Editing workspace, in the UV menu, select Export UV Layout
EDITING THE FACE TEXTURE OUTSIDE OF BLENDER
Open your editor of choice (Aseprite in this example), trim the texture so it’s centered. U can create the amount of different faces that u want to make using your editor of choice
Once u r done, export it in rows(so u can try to use a ratio like the original texture so the uvs don’t stretch too much)inside of Blender open the Texture workspace, in the Image menu(next to the UV one from before)select Replace…. Open the new exported texture, resize the uvs to fit(if one of them fits the rest of them ll fit later)
u can hide the other UVs with “h” and reveal hidden UVs with “alt” + “h”
and u r done
